Importing/Integration into Maya
This is a sample for embedding the output results of CriLipsMake2's Japanese 5-vowel animation curve file (.adxlip) into FBX.
Overview
The following scripts included in this package are used to import lip-sync data files (.adxlip) as animation keys:
- ADXLipSync2Maya.mel
- ADXLipSync2Maya.py
- ADXLipSync2Maya_py3.py
Please use these as samples for checking lip-sync data files in Maya or incorporating them into your existing workflow.
A sample scene for verifying the operation of the ADXLipSync2Maya script is also included:
cri/tools/CRILipSyncAlive/samples/MayaProject/adxlip_maya_import_sample

How to Use the Script
1. Prepare Files
Prepare the following files:
- Audio file of the dialogue (.wav)
- Lip-sync data file analyzed from the dialogue
- Maya scene of the character to assign the dialogue
2. Load Maya Scene
Open the Maya scene of the character to assign the dialogue from the main menu [File] - [Open Scenes...].
3. Load the Dialogue Audio File
Drag and drop the dialogue audio file (.wav) onto Maya's timeline.
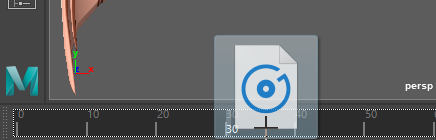
The audio file will be loaded, and the sound will play during preview. If the sound does not play, check the Playback speed item in [Preferences] - [Time Slider] or the [Play every frame] setting.
4. Load and Run the Script File
Run the ADXLipSync2Maya script. The script is located at cri\tools\CRILipSyncAlive\samples\MayaProject\adxlip_maya_import_sample\ADXLipsync2Maya_py3.py.
There are two ways to run the script: a) and b1~b3).
For MEL Script File
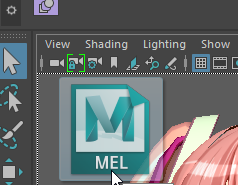
a) Drag and drop ADXLipSync2Maya.mel from Explorer onto Maya's viewport (loads and runs immediately).
For MEL or Python Script File
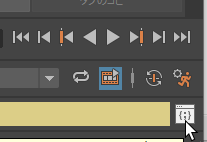
b1) Open the Script Editor (click the {;} icon at the bottom right of the Maya window).
b2) Drag and drop the script from Explorer onto the input area at the bottom of the Script Editor. Switch the input tab to [MEL] or [Python] according to the script type.
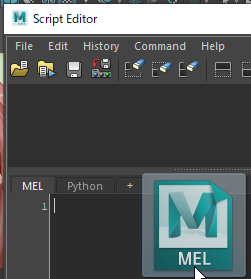
b3) After loading the script, press the Enter key on the numeric keypad to execute. When you run the script as above, the ADXLipSync2Maya dialog will appear.
5. ADXLipSync2Maya Dialog Settings
Set each item for import in ADXLipSync2Maya.

- Lipsync Data File (*.adxlip): Set the path to the lip-sync data file.
- Click the [Browse...] button and specify the lip-sync data file (.adxlip).
- Maya Scene fps setting: Specify the frame rate of the Maya scene (default 30fps).
- Blend Shape Group Name: Specify the blend shape group name displayed in the Shape Editor (default blendShape).
- Blend Shape: A, I, U, E, O: Specify the blend shape names corresponding to the mouth shapes for a, i, u, e, o.

6. Press the [Apply] Button to Execute
Press the [Apply] button to execute the conversion process from the lip-sync data file to animation keys using the configuration set above. When "*******Processing Exit*******" is displayed at the bottom right of the screen, the process is complete.

7. Preview Confirmation
Press the play button for preview, and the sound and mouth shapes will play simultaneously.
Explanation of ADXLipSync2Maya Script
This section is a developer explanation of the lip-sync data import script ADXLipSync2Maya. As a reference for workflow adaptation, the flow of the ADXLipSync2Maya script is explained. ADXLipSync2Maya is provided in both MEL and Python formats, and both perform the same processing. (Line numbers are for the MEL script version.)
Global Variable Definition (Line 12~)
Variables and initial values are set. If the format of the sample scene or various names differs, please change them.
Window Definition (Line 26~)
Defines the layout of the dialog.
loadLipfile() Function (Line 74~)
Defines the open file dialog displayed when the [Browse...] button is pressed in the dialog.
execlip2maya() Function (Line 84~)
Defines the function executed when the [Apply] button is pressed in the dialog.
-
Set information from the dialog (Line 95~)
- Concatenate strings to create blend shape names (Line 106~)
Creates attribute names in the format "BlendShapeGroupName.BlendShapeName".
- If you want to key a controller, you can specify the string as "ControllerName.translateX" in this section to change to other attributes.
- Concatenate strings to create blend shape names (Line 106~)
Creates attribute names in the format "BlendShapeGroupName.BlendShapeName".
-
Calculate the time per frame (msec) (Line 114~) Currently, the time per frame is calculated from the fps value set in the dialog, and the time (msec) in adxlip is converted to frames for keying.
-
Read adxlip file (Line 117~) The process for skipping the header section starts at Line 124.
-
Data conversion process for adxlip file (Line 135~) Read the lipsync information line by line until the end of the file, repeating the following process.
- Time processing
- Set the blend amount for each of the five Japanese vowels to the specified attribute
- Set keyframes
-
File close and completion notification (Line 167~)