CRIWARE Unity Plugin Manual  Last Updated: 2024-07-12
Embedding data into a game
This section describes how to embed the sound data created in CRI Atom Craft into a game and play it back.

It shows how to create a new Unity project and place the objects for sound playback in CRI ADX into the scenes.
The following shows the steps.

(1) Creating a Unity project

(1-1) Creating a Unity project
Start Unity and create an empty project.
In this tutorial, the "TutorialAtom" folder is used as the project folder.
  • Creating a new project in the Project Wizard window
    From the File menu, click New Project.
    The Project Wizard window appears. Specify the folder where you want to store the project.
    We want to create an empty project, so do not select any checkboxes from the Import the following packages list.
    Finally, click the Create Project button to actually create the project.

    adx2u_qstart_game_newproj_mini.png
    [Project Wizard]
(1-2) Saving a scene
After a new project is created, a scene appears. It contains only a "Main Camera".
Now let's save that scene.
In this tutorial, the name of the scene will be "NewScene".

  • Saving the scene in the Save Scene dialog box
    From the File menu, click Save Scene.
    The Save Scene dialog box appears. Enter the name of the scene.


    adx2u_qstart_game_newscene_mini.png
    After an empty scene is created
[Note]
Here, the coordinates of "Main Camera" are (0, 1, -10).

(2) Importing the plugin package

Now, let's import the "CRIWARE Unity Plugin package" into the project.
The plugin package file is at the following location in the SDK:

  * CRIWARE

  \ * SDK

    \ * unity

      \ * plugin

        \ * criware_unity_plugin_smartphone.unitypackage


  • Importing the custom package
    From the Assets -> Import Package menu, click the Custom Package menu command.
    A file dialog appears. Select the plugin package file described above and then import it.
    Attention
    If import fails, see Troubleshooting.

(3) Copying the CueSheet binary files

(3-1) Files required for playback
To play sounds in Unity, the following files from CRI Atom Craft are required:
  • "CueSheet binary files"
    • ACB file (*.acb): Cue information, playback parameters, and wave data for memory playback (one ACB file per CueSheet).
    • AWB file (*.awb): Wave data for streaming playback (one file per CueSheet if streaming playback is used).
    • ACF file (*.acf): Configuration and CueSheet-independent information (one file per project).
This tutorial uses the data created at " Creating data ".
The following picture shows the structure of the "Tutorial" project main folder for this tutorial.

Structure of the Tutorial project main folder for CRI Atom Craft
  * CriAtomCraft

  \ * Tutorial

    \ * TutorialProject

      o * WorkUnits

      o * Materials

      |  

      o * PC

      | \ * Assets

      |   o * Plugins

      |   | \ * CriWare

      |   |   \ * CriAtomProjInfo

      |   |     \ * CriAtomProjInfo_Unity.cs

      |   |  

      |   \ * StreamingAssets

      |     o * TutorialProject.acf

      |     \ * TutorialCueSheet.acb

      |  

      o * TutorialProject.atmcglobal

      o * TutorialProject.atmcproject

      o * TutorialProject.materialinfo

      \ * NewProject_[host


Project storage folder

Project folder

Work unit folder

Shared material folder


: * Folder where files required for playback are stored


Unity information file (required in old versions, but no need in new versions)
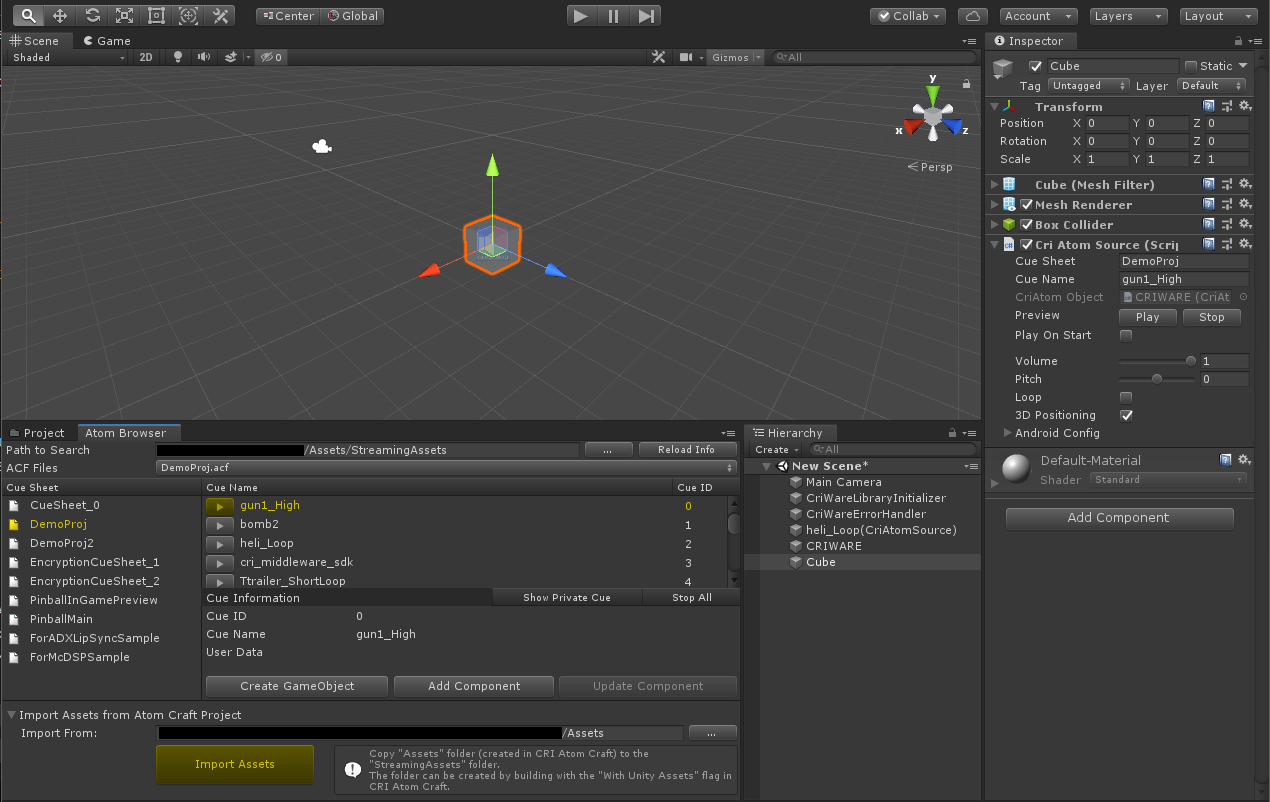


ACF file

ACB file


Global setup file

Project file

Material information file

name]_[user name].user_settings User setup file


(3-2) Copying files
Locate the "PC/Assets" folder under the "Tutorial" project file folder. This is where the CRI Atom Craft files we want are. Then copy its entire contents to the Assets folder of the Unity project.
While you can copy the files directly, it's easier to use the data copy function of the Atom Browser window .
Attention
If you would like CRI data to be handled as assets, please refer to the "Asset Support Add-on" pages listed below.
[Step 1]
First, make sure that the CRIWARE menu appears in the Unity menu bar.
It is not displayed immediately after the package is imported: click the menu bar once, and then it will be displayed.

adx2u_qstart_game_initializer_menu.png
CRI menu

In the menu, select the [Window]->[CRIWARE]->[Atom Browser] command.
The "Atom Browser" appears.
ADX2 data is not loaded in the Unity project yet. At the top of the Atom Browser, a message appears saying "No cue sheet is found."

adx2u_atomwnd_first.png
Atom Browser

[Step 2]
In the Atom Browser, click on the [Import From] -> [...] button. A file dialog appears.
Select the Assets folder that contains the files created by CRI Atom Craft.
It is usually the PC/Assets subfolder under your CRI Atom Craft project folder.
However, for in-game preview data, it should be the PC/inGamePreview/Assets subfolder.
Specify one of these folders.
If a non-Assets folder is specified, the error message below will appear in the console.

adx2u_atomwnd_assetroot_error.png
CRI Atom Craft output folder specification error

[Step 3]
If a valid folder is specified, the path display is updated.

adx2u_atomwnd_assetroot_set.png
CRI Atom Craft window (after the output folder is specified)

After specifying the folder, click on the Import Assets button at the bottom of the Atom Browser.
This will add a folder called Assets/StreamingAssets to your Unity project and add the necessary data files to it.

Structure of the Assets folder for the TutorialAtom Unity project
  * TutorialAtom

  \ * Assets

    o * Editor

    |  

    o * Gizmos

    |  

    o * Plugins

    | o * Android

    | o * cri_ware_unity.bundle

    | o * iOS

    | \ * CriWare

    |   o * CriAtom

    |   o * CriFs

    |   \ * CriMana

    |  

    \ * StreamingAssets

      o * TutorialProject.acf

      \ * TutorialCueSheet.acb


Assets folder


CRIWARE Unity Plugin


CRIWARE Unity Plugin source


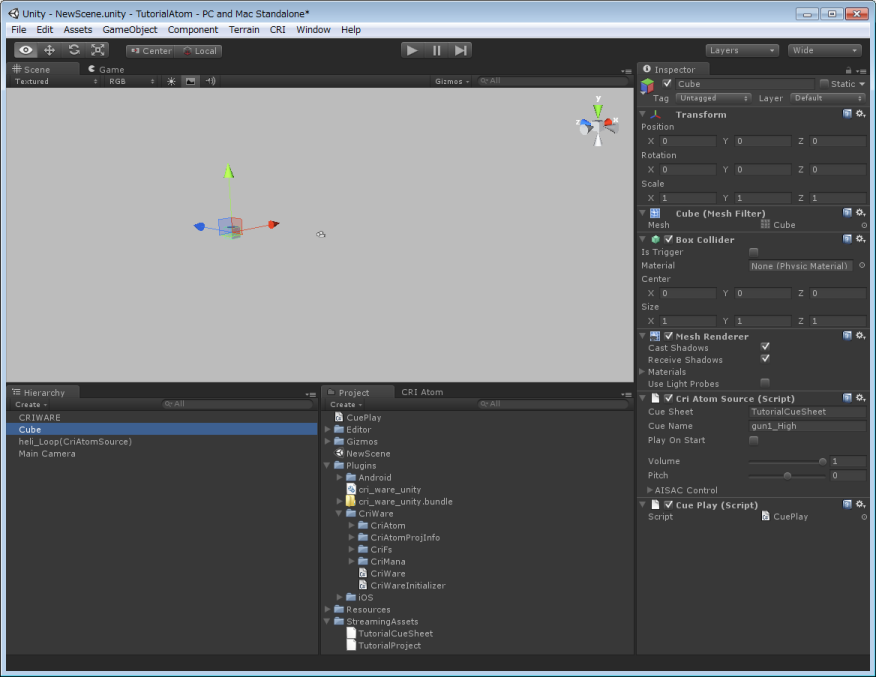
StreamingAssets folder

ACF file

ACB file


When the copy of the data is completed, the "Project view" in Unity is refreshed and looks like this:

adx2u_qstart_game_datafiles_mini.png
Copy of the data is completed

(4) Creating CRIWARE Library Initializer

Before using the sounds, let's add an initialization module and an error-handling module for the entire CRIWARE system.
Be sure to add these modules because the initialization module performs resource management such as the maximum number of simultaneous playbacks.
From the CRI menu in the Unity menu bar, select Create CRIWARE Library Initializer and then Create CRIWARE Error Handler.
In the Hierarchy window of Unity, the CriWareLibraryInitializer and the CriWareErrorHandler should appear.
At this point, you do not need to change their options.

adx2u_qstart_game_initializer_hierarchy.png
After the CRIWARE Library Initializer is created

(5) Examining a cue in the Atom Browser

Let's examine the copied CueSheet binary information in the "Atom Browser".
(5-1) Showing the "Atom Browser"
After copying the ADX data into the Unity project folder, Press the "Reload Info" button on the Atom Browser.
The message "No cue sheet is found." Disappears and the cue list is displayed.


adx2u_atomwnd_cue_list.png
Atom Browser


Since Atom Browser is used frequently from now on, let's dock it to the main window of Unity once.
(5-2) Reviewing the CueSheet information
The "Atom Browser" is a tool that enables the creation of CRI ADX components in Unity.
From this window, you can select a CueSheet, list the cues, and create CRI Atom Sources.
Look for the CueSheet label in the "Atom Browser". From that point, the CueSheet information is displayed.
If it is not displayed, if it is not displayed, check the path setting of "Path to Search" and then press the "Reload Info" button to get information on the cue list.

You can see the name of the CueSheet and a list of its cues.
When you select a cue in the list, the [Cue Infomation] information just below is refreshed.

(6) Creating a CRI Atom Source

Before you can play a sound in Unity, you must create a "CRI Atom Source".
This is all you will need to play sound.
The two methods described below can be used to create the CRI Atom Source.
You can select one or the other, depending on the situations.
  • Create it as a single "game object", and add a CRI Atom Source.
  • You can add it to another game object as a "CRI Atom Source component".
The following paragraphs show how to create a CRI Atom Source by using each of the two methods.

(6-1) Creating it as a single game object
First, let's create an CRI Atom Source that plays heli_Loop (looping sound of a helicopter).
  1. Do not select any object in the "Hierarchy view".
  2. In the "Cue Sheet" section of the "Atom Browser", select "heli_loop" in the list of cues .
  3. At the bottom of the "Cue Infomation" section of the "Atom Browser", click on the Create GameObject button.
A CRI Atom Source is created on the scene.

In the "Hierarchy view,the "heli_Loop(CriAtomSource)" game object that was just created is displayed.<br> If you click on it, the details of the CRI Atom Source will be displayed in the "Inspector."
There, select the Play On Start option of the CRI Atom Source.

adx2u_qstart_game_gameobj_le_mini.png
Creating a CRI Atom Source as a game object

heli_Loop will be played as soon as the game is started because the Play On Start option is selected.
Click the Play button in Unity to check it.
[Note] CRI Atom object
When a CRI Atom Source is created, a "CRI Atom" object named "CRIWARE" is automatically created.
CRI Atom is an object used to control the entire sound playback.

(6-2) Adding it to another game object as a component
This time, let's add a CRI Atom Source to another game object as a component.
  1. From the menu, select GameObject -> 3D Object -> Cube to create a cube.
  2. Check that the coordinates of the cube just created are (0, 0, 0).
  3. Select the cube in the "Hierarchy view".
  4. In the "Cue Sheet" section of the "tom Browser," select "gun1_High" (a gunshot sound) in the list of cues.
  5. At the bottom of the "Cue Infomation" section of the "tom Browser," click on the Add Component button.

The CRI Atom Source component is added to the cube.

Click on the newly created cube. In the "Hierarchy view,"?select the Play On Start option for the CRI Atom Source.

adx2u_qstart_game_gameobj2_le_mini.png
Creating a CRI Atom Source as a component
Since the Play On Start option for this new component attached to the cube is also selected, both gun1_High and heli_Loop will be played as soon as the game is started.

(7) Controlling sound playback with a script

So far, only simple sound playback is available. Now, let's add a script to interact with the game.
We will add a script that plays a sound when we click on the cube with the mouse.
(7-1) Adding a script that controls sound playback to the cube
Follow the steps below to add a script to the cube.
  1. Select the cube. In the "Inspector," clear the Play On Start option for the Cri Atom Source.
    (It cancels automatic playback when the game is started.)
  2. Select the cube in the "Hierarchy view".
  3. Right-click in the "Project view" to create a C# script.
    Rename the file to "CuePlay".
  4. Drag and drop CuePlay.cs onto the cube in the "Hierarchy view" to add it to the cube.

    adx2u_qstart_game_gameobj2_cueplay_mini.png
    Adding a script to the cube

Start MonoDevelop and modify CuePlay.cs as shown below.

public class CuePlay : MonoBehaviour {
// Use this for initialization
void Start () {
}
// Update is called once per frame
void Update () {
}
void OnMouseDown() {
CriAtomSource audio = (CriAtomSource)GetComponent("CriAtomSource");
audio.Play();
}
}

OnMouseDown handler
In this script, the OnMouseDown handler is used to describe what should happen when the mouse button is clicked.
First, we get the CRI Atom Source component assigned to the object.
Then, the cue specified for this CRI Atom Source is played.

(7-2) Executing the game
Click on the Play button in Unity to execute the game.
The moment the game is started, heli_Loop (looping sound of a helicopter) is played.
When the cube at the center of the scene is clicked, gun1_High (gunshot) is played.

adx2u_qstart_game_gameobj3_run_mini.png
Executing the game